Friday 3 February 2017

Server 2016 Nano Server, grow Cluster Shared Volume (CSV) using PowerShell.

Hello,

Growing a disk was always been so easy in the past, but with Nano server, you have to figure out a way to do it via PowerShell, as the option to Grow partition was grayed out for me in Server Manager (added as a remote server), and there is no DiskPart.

The procedure is pretty simple once you get it figured out. I took most of the information from another blog, but modified it a little bit to deal with CSV, as the other blog did not. I tried to find the link to the original blog but couldn't find it.

Anyways, here are the steps required:


  1. Expand the LUN on your SAN first.
  2. Connect to a remote PoweShell session on your Nano Server.
  3. Execute Update-HostStorageCache to rescan for storage changes.
  4. Type get-disk to get the information about the disks on your system. Take note of the disk number in the first colum. Let's assume I am working with disk 1.
  5. Type get-parition -DiskNumber 1 this will show you the partitions on the disk in question. Take note of the Partition Number, in my case, it's 2. 
  6. Execute Get-PartitionSupportedSize -DiskNumber 1 -ParitionNumber 2 to verify that the SizeMin and SizeMax are different numbers. SizeMax should be the size of your underlying disk, whereas SizeMin would be your current parition size. 
  7. Set a variable to match SizeMax so that you can grow the partition to the full size of the disk. Execute the following command, $MaxSize = (Get-PartitionSupportedSize -DiskNumber 1 -PartitionNumber 2).sizeMax
  8. Finally run this command to change your disk to the size set in the MaxSize variable, Resize-Partition -DiskNumber 1 -PartitionNumber 2 -Size $MaxSize


ESXi Hosts Disconnects, SCVMM 2016 V2V fails with "VMM is unable to complete the requested file transfer" - Error 2940

Hello,

I battled with this for a few hours before I finally found the answer here. One of the users on there pointed me into the right direction, so I started looking. I have never been to this advance area of ESXi so I didn't even clue in to what the user on the forum was saying exactly, so I decided to get a couple of screen shots to make it easier, as inevitably there will be more and more people who move to Hyper-V and want to do V2V over from Vmware.

.
All you have to do if you get the error below is navigate to your vSphere client, select the host(s) where the VM you are trying to V2V resides, and navigate to the configuration tab, click on "System Resource Allocation", followed by Advanced at the top right.


Find "hostd" in the list of resources, and click on Edit Settings:


Set the Memory Limit to unlimited. Your V2V should now complete successfully. 

It seems like the hostd process runs out of memory and crashes, causing the V2V process to fail and the host to temporarily disconnect. I would recommend you take the note of the previous memory limit and set it back to that value after you are all done with your V2Vs. 

Hope this helps somebody. 

Thursday 26 May 2016

Cisco IOS DHCP with LONG option 43 for Lync/Skype for Business

Hello Everyone,

So I have been bashing my head against the wall on this one for a while, so I figured I write a blog post about it so other's will hopefully not have to.

There is plenty of information online on how to setup option 43 for Lync/Skype for Business, however, lots of this information is outdated, and many have found that their FQDN for their Lync certificate server is too long for Cisco DHCP and gets truncated, causing it not to work. We have over a hundred remote sites where we deploy DMVPN routers, so using local DHCP on the Cisco router makes the configuration a million times better.

I battled with it for a long time, until I accidentally stumbled upon an extra variable available in newer Cisco IOS. I don't know exactly when it came into play, but there seems to be no mention of this anywhere on the internet.

The extra option is simply "ext", so instead of typing option 43 hex ......you type option ext 43 hex...and your long string option 43 is accepted, and best of all, WORKS!

To summarize everything in one page, you run DHCPutil.exe off your Lync server as such:


dhcputil.exe -sipserver servername.domain.com

You will need option 120 value in full, and option 43 value in full.

On the Cisco DCHP server, you would simply run the following to make a DHCP scope, with your own values and additional options:

ip dhcp pool DATA-POOL
 network 10.192.12.0 255.255.255.192
 domain-name corp.eblend.local
 dns-server 10.193.8.124 8.8.8.8
 default-router 10.192.12.1
 option ext 43 hex YOURLONGHEX43STRINGHERE
 option 120 hex YOUROPTION120STRINGHERE
 lease 8

Hope this was helpful to someone.


Friday 24 April 2015

Flash Dell Firmware into Seagate Generic Drives (ST3450856SS to HS11 Firmware update, maybe others)


Hello,

I am building a server for one of my small business clients, it's a Dell PowerEdge 2950 with a Perc 5i RAID controller on board. This is an older server, but it is plenty powerful for what I need out of it. The idea is that this server will be used as an iSCSI target for an ESXi host. I don't know where the server initially came from, but when I got it from the client to build out, it only had 3 hard drives in it of various sizes, nothing big enough to be a storage server. I had a collection of old ST3450856SS hard drives from an old HP MSA2000 storage frame which were SAS drives of 450GB. I got the additional drive cages as required and mounted 6 of these old HP SAS disks into the server. The Perc 5i controller picked up on them no problem, and I was able to create a RAID5 set and off I went...however, I soon discovered some issues.

Now Perc 5i created the drive array no problem, it was accessible, but when I tried to run a CrystalDiskMark benchmarking tool on the server, the controller would drop out with Windows Event error 129, Reset to device, \Device\RaidPort1. The read portion of the software was fine, but it seems that as soon as it switched to Write tests, it would die, sometimes right away, at other times a few runs in. I started looking for a solution and updating everything, and one of the things that I wanted to update was the hard drive firmware. I looked up model number  ST3450856SS + firmware on google and found that Dell also uses these drives for some of their servers, so I thought I will just flash the newest firmware from Dell into these and it will be happy...but this was not so easy...actually it was not easy at all.

Now, on this Dell server I installed the Dell Openmanage Server Administrator and it showed that the disks were detected as ST3450856SS with firmware version 0007, and that the latest firmware available for these types of disks from Dell was HS11.


I downloaded the Windows firmware update packages called SAS-Drive_Firmware_288PJ_WN32_HS11_A07.exe, assuming that I would be able to just run the program and it would update all the drives, however, this was not the case. The package does some validation to see if the drives you have will actually work with this firmware, and returned a message:

This update package is not compatible with your system configuration

Great, so I stared looking online to see what this is, and there isn't much information other then to ensure that you have the latest drivers and such from Dell, I do, and none of it worked.

I started working to see how I could circumvent the firmware process, and the first thing I did was to extract the firmware update package exe file with UniExtract,  This gave me something like this:


Under the payload folder there was the actual firmware file, HS11.fwd. In the root was a file that seems like it would be responsible for the actual loading of the firmware called SASDUPIE.exe, so I did a /? on this executable under CMD and came up with the following path for the firmware update:

SASDUPIE.exe -u -s "%cd%\payload" -f -o update.xml -debug debug.log

When I ran the above command, it finished running very quick, must faster then would be required to upgrade the firmware on 6 SAS disks, so I looked at the debug.log file it create for some clues.

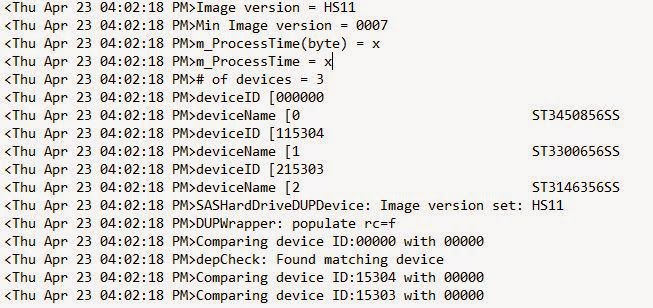
The first clue was the detection process and what it was looking for. The Seagate drives I have were being detected as Hardware ID of 00000, whereas the firmware was looking for 3 different Hardware IDs, corresponding to three different drive sizes this one hardware package could upgrade. So somehow, I had to trick the firmware into thinking that 00000 that it is detecting is actually the ST3450856SS hard drive. Here is the line in the debug.log that shows the detection process. I didn't get to capture the previous log, but here is what it looks like when it makes a successful detection, notice the 00000 being detected as the right model number:


I used the HEX editor to open the HS11.fwd firmware file and look inside. During my research into the topic of flashing the firmware, I read that a Dell version of the firmware would carry a Dell specific header in the first 256bits of the file, and this header is all that differentiated the firmware file from a generic Seagate firmware release. When I opened the file in HEX editor, this is what I saw first at the top:


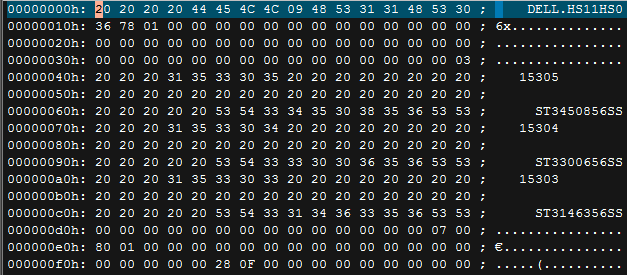
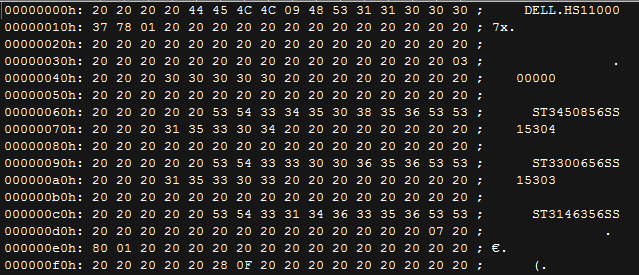
As you can see, there are three sets of numbers on the side, 15305, 15304 and 15303. Each of those numbers is what we saw earlier in the debug log, and these numbers are followed by the model number of the hard drive. For me, 15305 and the model number ST3450856SS is of importance, so I busted out the "Replace" feature in my Hex editor and replaced the text 15305 with 00000. I saved the edited file over the original and tried to run the SASDUPIE.exe command again as I did previously to look at the debug log. This time, I got a message that there is a version check error, and that to install HS11, you need to have HS06 first, but my drives were reporting the firmware level of 0007 (from HP), so I had to do more modifications with Hex. As yo can see in the previous image, right at the very first line, there is a line of DELL.HS11HS06, so I replaced HS06 with 0007 and saved the file again. This is what the file looked like after the changes:


Upon running SASDUPIE.exe command again, it took considerably longer to complete, however, despite now matching the model number and firmware revision, it still failed. I was sensing that I was getting close, and thought that perhaps I need to flash the older version of the firmware first, but it was the end of the day for me so I left it for the next day. 

The following day I tracked down the HS0F firmware (F is higher than 6 in Hexadecimal, and HS06 is the minimum required, but I couldn't find that firmware easily) and opened it again in a Hex editor. 

This time, I made the same changes as before to HS0F firmware, replaced HS06 with 0007 and 15305 model number with 00000. At this point, I think it would work if you were to save the file into the payload directory and run SASDUPIE.exe command again, however, I didn't try this, as I already moved on to a different firmware upgrade process, but in hindsight I think it would have worked right from windows. 

Dell makes a downloadable utility called the "
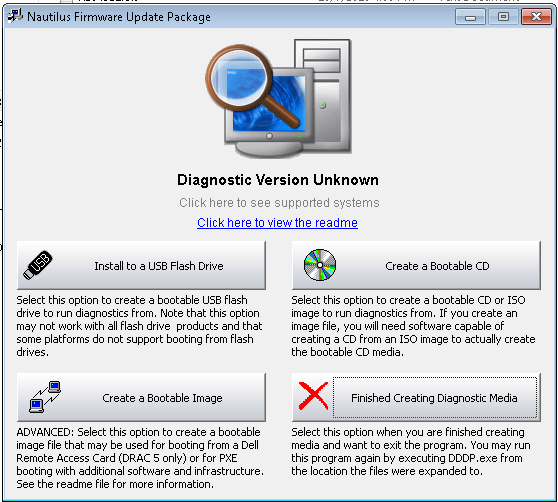
Dell SAS Hard Drive Firmware Utility" which can be installed in Windows, and then used to create a bootable USB drive to do firmware updates without windows. I ran the utility and it extracted the file contents to C:\Dell\Drivers\RG1GN\. If you navigate further to C:\Dell\Drivers\RG1GN\files\fw\sas\seagate\15K6 you will find all the firmware that is available for the particular Seagate drive. The files found here for HS0F and HS11 are the same files that you would have downloaded earlier, all in one place. I deleted all the other firmware versions and just left the HS0F.FWD file in there, the one I modified earlier to look for 0007 firmware. From this point, if you backtrack to C:\Dell\Drivers\RG1GN\ there is a utility called dddp.exe, run it and click on Install to a USB Flash drive, plug in a USB drive, and let it quickly build.


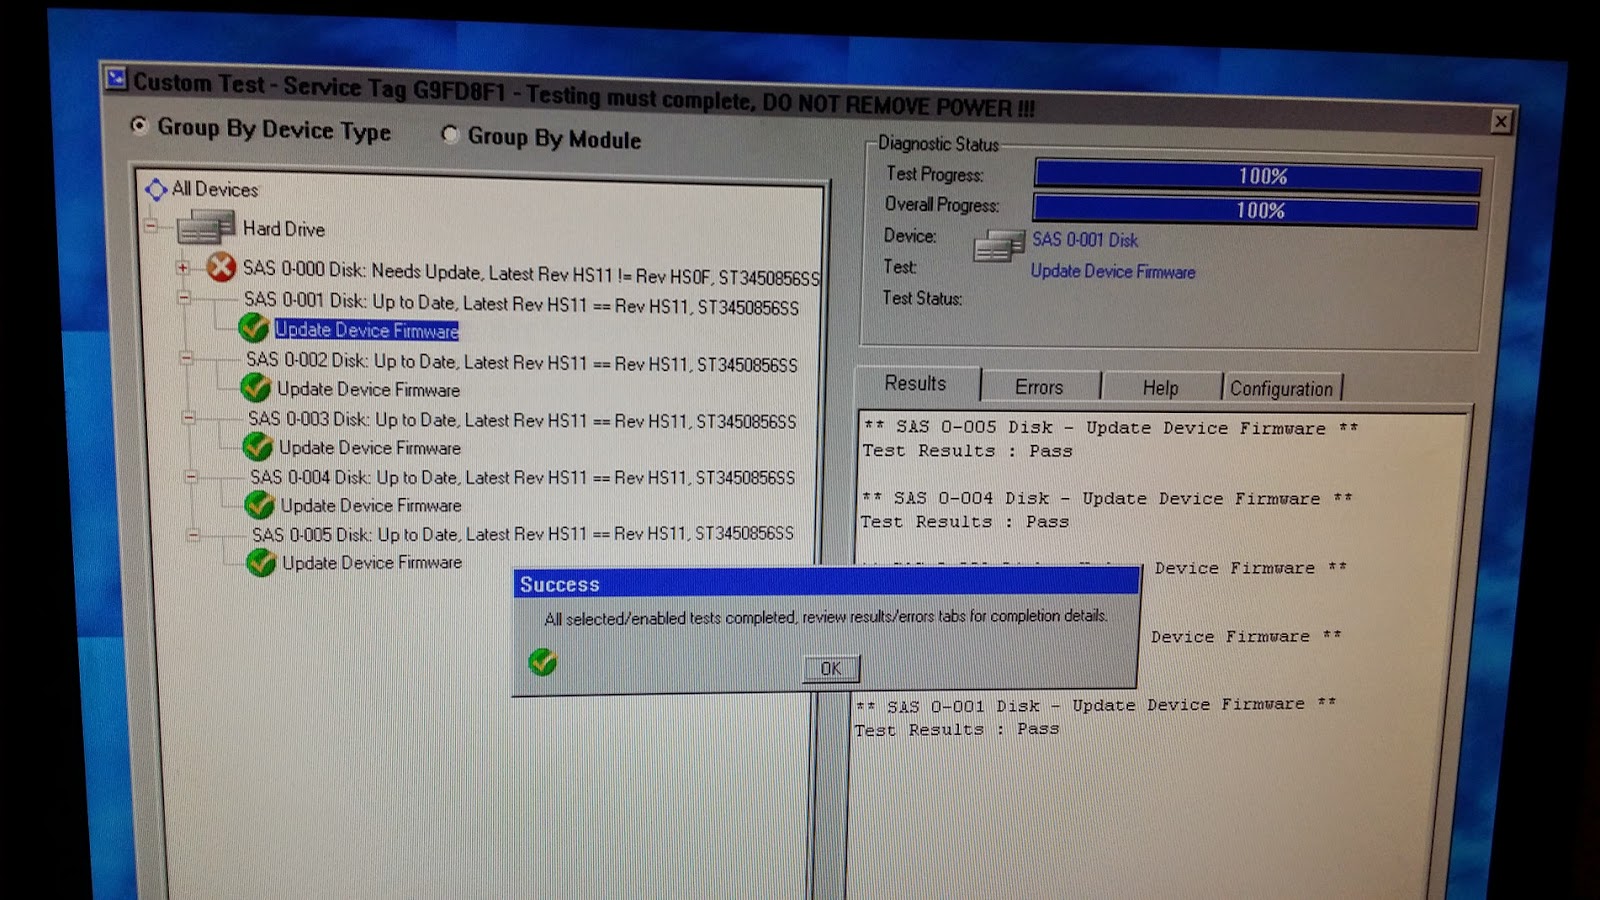
Once I booted off the USB into the interactive mode, it found my drives and said the firmware update was available. I clicked on Update on each drive (it locks your mouse, so don't freak out, takes about 5 min to read S.M.A.R.T. information twice, you can see the countdown at the top) and to my surprise, it went! I did this to all 6 disks! After this was all done, I went back into Windows, and put the previously edited HS11.fwh file in and recompiled the boot USB, however, it failed, but I knew why! 0007 version no longer exists on these drives, they are all now HS0F! Going back into the HEX editor, I changed the HS11.fwh file again and adjusted the header to it's original state of DELL.HS11HS06. I rebuilt the USB boot file again, and this time, success! All drives were updated to the latest from Dell, HS11! Woo hoo! Unfortunately, it didn't solve my Perc 5 errors in Windows, but at least I knew the drives were not the contributing factor, at least not on the firmware level. 


I realize that this is very specific to one version of the drive, but I believe you can use this approach probably with most firmwares, and perhaps not only from Seagate, but I haven't tested that theory yet. As long as the firmware appears to have a Dell header, using Dell tools to update the firmware should be just a matter of making similar changes. 


Thursday 24 April 2014

MBAM 2.0 SP1 - Things Learned + MBAM Supported Computer Query

Has been a while since I last posted here, but it just seems like all the things that I come across are usually SCCM related or desktop related, even though I am a server guy, but here it is.

We have been using Microsoft Bitlocker Administration and Monitoring (MBAM) 2.0  for a while now and it has been working just fine, however the new SP1 came out not too long ago, and it was time for the update. If you have worked with MBAM before, you will know that it isn't a simple upgrade process, and is actually a full uninstall and reinstall, but you can keep your database, which is a good thing obviously as it contains all of your recovery information. I struggled for 2 days with the upgrade, and I figure I best post here all the places where I went wrong, and all the things learned.

First, I will explain our environment. Our initial MBAM 2.0 configuration was split over two servers, server1 was the web interface for all of the MBAM functions, and server2 was actually out SCCM 2012 SP1 CU3 server, where we installed all of the other features, including the reports which used the same SSRS instance as SCCM did. During the upgrade we wanted to consolidate MBAM onto the same server as SCCM only, so that made things a little bit more interesting. In our small environment we have a single SCCM server and a few distribution points, and we DO NOT use SSL communication for our SCCM clients.

So first things first, installing MBAM 2.0 SP1 on the same server is very much possible, and you can even use the same port number as you had used for other functions, as long as you add a hostname during the installation that is different than what you have previously used, and ofcourse create a DNS alias for the hostname. I used the default port 443 for our configuration as we were using SSL for MBAM Client to MBAM server communication, and a hostname of mbam.domain.com

During the installation, one of the items that is installed is the Audit Reports, which allow you to track who has retrieved which key for which machine for auditing purposes. I have a service account that I use for all things SCCM, which is a domain admin to make things easier, so during the prompt for a username and password for Audit Reports section of the install, I used the same account just mentioned; however, the install always failed, with this line being found in the logs:

CustomAction InstallReportsDeferred returned actual error code 1603


If I chose not to install the reports, the installed always went through the process without any errors. I battled with this for almost two days, trying to figure out what is going on. I remembered that we had this issue before when upgrading from MBAM 1.0 to 2.0, and I remembered that it had something to do with permissions, so I tried all kinds of things to get this service account greater permissions then what it already had, with multiple changes in ADSI edit, changes to the computer account of SCCM, you name it, all to no avail. I tried to research as much as I could, and at one point, I found a thread where someone mentioned that the account used here should be an account dedicated just for MBAM reports. I created a new run of the mill account, entered that information during the prompt, and whola, the installed went without any issues! I think this problem may be specific to our environment as SSRS is already aware of our SCCM service account I was always trying to use, and since I am using the same SSRS server for MBAM, perhaps it tried to modify permissions for that account and SCCM wouldn't let it, I will never know, or care, as I got it working.

During the install I picked the default port 443 for communication and instead of server2.domain.com I entered mbam.domain.com for the hostname as that's the alias I wanted to use to access my MBAM webpages. When I tried to first login to MBAM helpdesk webpage, it would give me this error on the right frame of the page:
I did a quick search online which lead me to this KB from Microsoft. I commented out the DNS entry as explained in the example and restarted IIS and the error went away. I think this error has something to do with using hostname that doesn't match the actual server name, but regardless, this was the fix.
 
The final hurdle I had to face was to do with the MBAM Supported Computers Query. In MBAM 2.0 the query worked very well and only had the physical boxes which supported TMP listed in there, however, with SP1, it started showing all kinds of strange things, like our thin clients and virtual machines, despite the query saying to exclude those things. I compared the query from 2.0 to 2.0 SP1 and noticed that the placement of the TPM check was in a different location in the query, so I moved it to the same location as it used to be on the older version of MBAM and it fixed the problem, so I think it's a bug. This query also takes into account windows 8.1 for those who are using it.
 
This is the fixed query that worked for me:
 
select SMS_R_SYSTEM.ResourceID,SMS_R_SYSTEM.ResourceType,SMS_R_SYSTEM.Name,SMS_R_SYSTEM.SMSUniqueIdentifier,SMS_R_SYSTEM.ResourceDomainORWorkgroup,SMS_R_SYSTEM.Client from SMS_R_System        inner join SMS_G_System_OPERATING_SYSTEM on SMS_G_System_OPERATING_SYSTEM.ResourceID = SMS_R_System.ResourceId        inner join SMS_G_System_OPERATING_SYSTEM_EXT on SMS_G_System_OPERATING_SYSTEM_EXT.ResourceID = SMS_R_System.ResourceId        inner join SMS_G_System_COMPUTER_SYSTEM on SMS_G_System_COMPUTER_SYSTEM.ResourceID = SMS_R_System.ResourceId        left outer join SMS_G_System_TPM on SMS_G_System_TPM.ResourceID = SMS_R_System.ResourceId  where ((SMS_G_System_OPERATING_SYSTEM.Version like "6.1.%"        and SMS_G_System_OPERATING_SYSTEM_EXT.SKU in (1,4,27,28,70,71))        or NOT (SMS_G_System_OPERATING_SYSTEM.Version like "6.0.%"        or SMS_G_System_OPERATING_SYSTEM.Version like "5.%"))        and SMS_G_System_COMPUTER_SYSTEM.DomainRole = 1        and SMS_G_System_COMPUTER_SYSTEM.Model not in ("Virtual Machine")        and SMS_G_System_TPM.SpecVersion >= "1.2"
Hope this helps someone if they are experiencing any of these issues, as the information out there is pretty slim.


Tuesday 19 November 2013

HP EliteBook 820/840/850 Network Driver under SCCM 2012 WinPE

Hey guys,

Ran into an interesting issue today that I should have probably known about but didn't. Was trying to image a brand new Haswell based HP EliteBook 840 G1 and no matter which driver I added to my Boot Image in SCCM 2012, it would come up with the "Network adapter not found" or something along those lines. I am doing Windows 7 image for this machine so I downloaded Windows 7 drivers to use during the task sequence, and used the exact same network driver for the WinPE portion. As nothing was working I tried doing a quick search online and some people reported similar problems on other HP hardware and had success with older drivers. I tried older drivers, as well as drivers for Windows 8.1, but still nothing. I did more digging, and found out that WinPE for SCCM 2012 SP1 CU3 is based on Windows 8. Once I inserted the Windows 8 driver, the network came up without issue! So I guess these drivers are very OS specific.

I have always used Windows 7 drivers in all my deployments here in WinPE and they always seemed to have worked, but to my surprise not Windows 7 or even Windows 8.1 drivers worked, it had to be the exact Windows 8 driver.

Hope this saves people some frustration!


Wednesday 16 October 2013

Workstation Migration Assistant - Run USMT as Non-Admin user

Hi guys,

Recently I have been tasked with creating another task sequence to capture and rebuild a Windows 7 workstation using USMT. As I have previously built our XP to Windows 7 migration task sequence, I was well aware of what to do; however, I thought it was cumbersome to do the same thing for a system rebuilt type of scenario, and not a complete OS migration.

I have in the past created a little batch script that would allow me to use USTM executables manually outside of SCCM, but unfortunately I forgot to back them up when we moved on from SCCM 2007 to SCCM 2012. The idea is to have an IT person go to the users computer, backup their profile, and then restore it, the easiest way possible.

Not wanting to invest time in recreating a simple batch script with no user interface, I started looking around for a GUI based USMT product. There are a few different GUIs out there that basically put a pretty face on USMT commands, however, those that looked good were not free, and those that were free, well, were not very good. I did stumble onto one GUI that looked very professional and minimalistic, yet had a bunch of great features built in that made it "smart". Workstation Migration Assistant by Dan Canningham seemed the fit the bill.

I downloaded the program and configured the MigAssistant.exe.config file with the settings I would like, including my designated USMT data store. This datastore is used to save the backups, as well as restore from, all without having to specify anything within the app. This is great as it makes it very easy for a desktop administrator to simply backup and restore, without having to worry about where the files are placed ect. Using the config file I was able to make this my default selection within the app:


I tried running the program as my slightly elevated standard account on my desktop and it ran perfectly. I was then able to restore the information on another machine and everything worked great. I thought that I have found the perfect tool, I could run it as the user, backup the data, and be on my way; however, when I tried to do the backup as a standard user with no system rights, I was prompted for the admin account. This in itself isn't bad; however, the default configuration of "I am the only person who uses this Workstation" that I wanted to use no longer worked, as the system tried to backup the profile of the admin account I entered to let it run in the first place. To top it off, every time I opened the program even as an administrative user, it would always prompt with the UAC prompt to allow the program to run.

Because I really liked the program and wanted it to be as simple as possible for our staff, I decided to do some digging to see why the UAC prompt was popping up, and how to make the program run as a standard user.

During my research I found that when a program is compiled, the "requestedExecutionLevel" is what controls the UAC prompts, which decides if you should enter admin credentials to run the program or not. The source code for Workstation Migration Assistant was available on Dan's website, but I haven't touched any development tools in ages and would be lost trying to recompile the original source code. Remembering a tool I used back in the day, I thought I would give Resource Hacker a shot and see if I can do anything within that tool to modify the MigAssitant.exe file from Dan's program. I loaded up Resource Hacker and opened the MigAssistant.exe file, and low and behold, under a strange entry of 24>1>0 I found exactly what I was looking for

<?xml version="1.0" encoding="utf-8"?>
<asmv1:assembly manifestVersion="1.0" xmlns="urn:schemas-microsoft-com:asm.v1" xmlns:asmv1="urn:schemas-microsoft-com:asm.v1" xmlns:asmv2="urn:schemas-microsoft-com:asm.v2" xmlns:xsi="http://www.w3.org/2001/XMLSchema-instance">
<assemblyIdentity version="1.0.0.0" name="MyApplication.app" />
<trustInfo xmlns="urn:schemas-microsoft-com:asm.v2">
<security>
<requestedPrivileges xmlns="urn:schemas-microsoft-com:asm.v3">
<!-- UAC Manifest Options
If you want to change the Windows User Account Control level replace the
requestedExecutionLevel node with one of the following.
<requestedExecutionLevel level="asInvoker" />
<requestedExecutionLevel level="highestAvailable" />
If you want to utilize File and Registry Virtualization for backward
compatibility then delete the requestedExecutionLevel node.
-->
<requestedExecutionLevel level="requireAdministrator" />
</requestedPrivileges>
<applicationRequestMinimum>
<defaultAssemblyRequest permissionSetReference="Custom" />
<PermissionSet class="System.Security.PermissionSet" version="1" Unrestricted="true" ID="Custom" SameSite="site" />
</applicationRequestMinimum>
</security>
</trustInfo>
</asmv1:assembly>
Right there, not only does it show the exact field I was hoping to change, it also shows just above the various possible execution levels that I can set! I changed the "requireAdministrator" field to  "asInvoker", pressed the compile button, followed by a save, and ran the executable, and to my surprise, Migration Assistant opened without a single prompt for even the most basic user! Now, I knew the real test would come with being actually able to backup and do the restore, so I was only a third of the way there, at best.

As expected, trying to run the backup and restore procedures failed, with the logs pointing to permissions, as scanstate.exe and loadstate.exe that this program calls require admin rights to actually capture and restore the profile. So I did what I thought would be crazy if it worked, and opened up both scanstate.exe and loadstate.exe using Resource Hacker, and under the same strange grouping of 24 > 1 > ## I found the execution level assignment for both loadstate.exe and scanstate.exe.

<?xml version='1.0' encoding='utf-8' standalone='yes'?>
<assembly
xmlns="urn:schemas-microsoft-com:asm.v1"
manifestVersion="1.0"
>
<trustInfo xmlns="urn:schemas-microsoft-com:asm.v3">
<security>
<requestedPrivileges>
<requestedExecutionLevel
level="asInvoker"
uiAccess="false"
/>
</requestedPrivileges>
</security>
</trustInfo>
</assembly>
Running a program asInvoker means that it will run in the user context, and if that user has no rights to do what is needed, the program will fail to execute. So I decided to try out  "requireAdministrator" as the execution level within scanstate.exe and loadstate.exe, compiled the script and saved the executables. I did not expect it to work, but to my surprise, it worked even better than I expected!

With the user logged in, we are able to now open the program without any prompts, and simply press "Start", at which point scanstate.exe is called, and a prompt for administrator password is required. We enter our administrator password, and off it goes, backing up the original user who opened the Migration Assistant in the first place, and not the administrator who allowed the action. Restore works exactly the same way, asking for the administrator password to continue. The great thing about this GUI is that is even has a drop down box should you have multiple backups, and allows you to select which one you would like to restore. The program automatically looks for all the backups performed by this user using the _userID naming context and gives you the option to restore any of the backups you have, from any other computer.


I have attached the full program below with the modified MigAssistant.exe and scanstate.exe and loadstate.exe files. Extract the bundle, make the proper changes within the MigAssistant.exe.config file, and it should be ready to use!

Hope you guys find this info, and especially the tool as useful as I have. Big props to Dan for making this awesome GUI.

DOWNLOAD